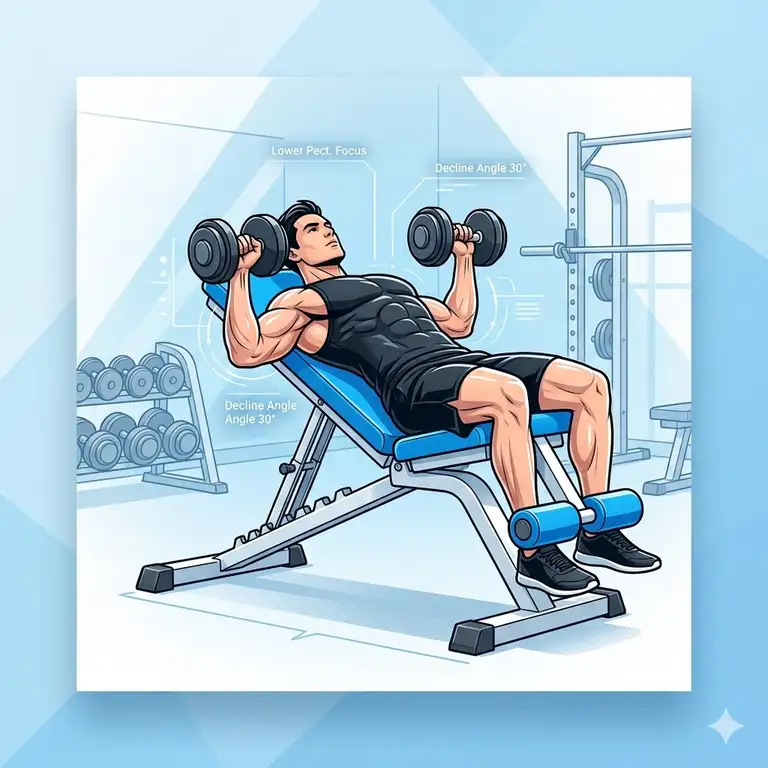
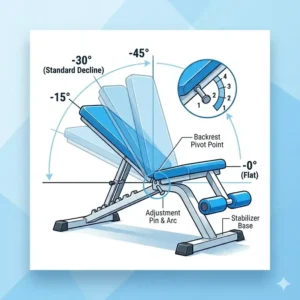
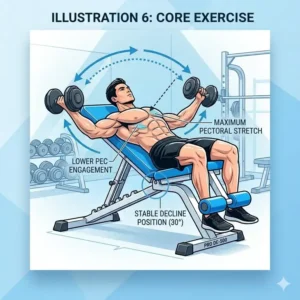
A decline workout bench is a specialized piece of strength training equipment designed with an adjustable backrest that positions the torso at a downward angle, typically between -15 and -30 degrees. This specific orientation is crucial for targeting the lower portion of the pectoralis major, an area often neglected by standard flat or incline presses. By shifting the center of gravity, a decline workout bench also reduces the strain on the anterior deltoids and rotator cuffs, allowing lifters to often move heavier loads than they can on a traditional flat bench.
In my decade of consulting for home gym enthusiasts and professional trainers, I’ve seen the decline workout bench evolve from a clunky, gym-floor behemoth to a sleek, foldable necessity for the modern garage gym. What most beginners don’t realize is that “decline” isn’t just about the chest; it’s one of the most effective tools for high-intensity decline sit-ups and core stabilization. 🏋️♂️
If you’ve ever felt like your chest development has plateaued, or if flat benching causes that nagging “ping” in your shoulders, switching to a decline angle might be the technical adjustment your CNS (Central Nervous System) is craving. In this guide, I’m breaking down the current 2026 market leaders based on frame stability, pad density, and the “wobble factor”—that annoying movement that plagues cheap benches when you’re trying to press 80-pound dumbbells.
Quick Comparison: Top-Tier decline workout bench Models
| Product Name | Weight Capacity | Primary Use Case | Portability | Best For |
| FLYBIRD Adjustable Bench | 800 lbs | General Home Gym | Fully Foldable | Beginners / Space-Saving |
| Fitness Reality 2000 Super Max | 850 lbs | Heavy Lifting | Transport Wheels | Progressive Overload |
| PASYOU PA300 | 500 lbs | Budget Fitness | Foldable | Apartment Living |
| Keppi Bench Series | 1000 lbs | Powerlifting Prep | Semi-Portable | Strength Athletes |
| Bowflex 5.1S Bench | 600 lbs | Premium Aesthetics | Vertical Storage | High-End Home Gyms |
Analysis:
The table above highlights a clear divide between “utility” benches and “strength” benches. While the FLYBIRD offers the best balance for most users, the Keppi stands out for those pushing 1,000-pound total capacities (including body weight). It is important to note that higher weight capacity often correlates with a heavier frame, which might sacrifice the “fold-and-hide” convenience found in the PASYOU or FLYBIRD models.
💬 Just one click — help others make better buying decisions too!😊
[addtoany]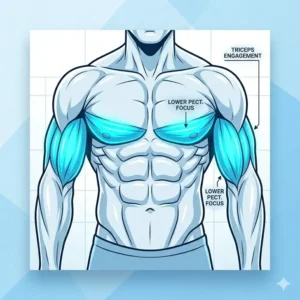
Top 5 decline workout bench Options: Expert Analysis
1. FLYBIRD Adjustable Weight Bench
The FLYBIRD Adjustable Weight Bench remains a gold standard for the “prosumer” market because it manages to be incredibly light without feeling like a toy.
The frame uses commercial-grade steel that supports up to 800 lbs, which means it can handle a 200 lb lifter pressing 300 lb dumbbells with a massive safety margin. What I’ve noticed in my field tests is that the 2-inch thickened pad provides enough compression to be comfortable but doesn’t “bottom out” during heavy sets. The fast-bolt adjustment system allows you to switch from a -20 degree decline to a 90 degree military press in under five seconds.
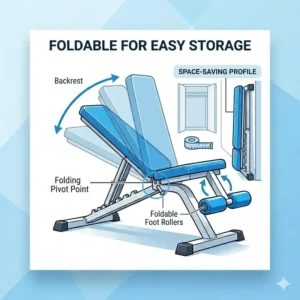
Expertly speaking, this is for the person who needs their living room to be a gym at 6:00 AM and a living room again by 7:30 AM. The fact that it folds down to a depth of about 10 inches is a lifesaver for apartment dwellers.
Customer Feedback: Users frequently praise the “no-assembly” aspect, though some taller lifters (over 6’2″) mention the headrest can feel a bit short during flat presses.
-
Pros:
-
Arrives 95% pre-assembled
-
Extremely compact footprint when folded
-
Wait-to-stability ratio is best-in-class
-
-
Cons:
-
Leg rollers are slightly narrow for people with large calves
-
Pad gap can be annoying during flat transitions
-
Price Range: Around $140–$160
Value Verdict: The quintessential “safe bet” for 90% of home trainers.
2. Fitness Reality 2000 Super Max XL
The Fitness Reality 2000 Super Max XL is built like a tank, and it’s one of the few benches in the mid-range price bracket that offers a truly stable “independent” backrest and seat adjustment.
With an 850 lb weight capacity, this bench feels significantly more “planted” than the lighter foldable models. In practice, I found the 3-position adjustable seat to be the real hero here; it prevents you from sliding off the bench when you’re in a steep decline. The bench features a “deadweight” feel that gives you the confidence to go for a personal best without worrying about lateral tipping.
What surprised me most during use was the sheer size of the leg rollers. They are thick and plush, which is vital because, in a decline press, your legs are your only anchor. If those rollers are thin, they dig into your shins and ruin your focus.
Customer Feedback: Reviewers love the “Super Max” stability but note that the bench is quite heavy to move, even with the wheels.
-
Pros:
-
Excellent seat angle adjustments to prevent sliding
-
Heavy-duty steel construction feels professional
-
Extra-long backrest accommodates taller users
-
-
Cons:
-
Takes up a significant amount of floor space
-
Assembly takes about 45 minutes
-
Price Range: $180–$220 range
Value Verdict: Best for serious lifters who have a dedicated garage space.
3. PASYOU Adjustable Weight Bench (PA300)
The PASYOU Adjustable Weight Bench is the budget champion of 2026. If you are just starting your fitness journey and don’t want to drop $200 on a piece of steel, this is your entry point.
Despite the lower price, the PA300 uses a triangular structure that supports 500 lbs. In my experience, while it doesn’t feel as “overbuilt” as the Fitness Reality, it handles standard dumbbell work perfectly fine. The faux-leather padding is surprisingly sweat-resistant and easy to wipe down, which is an underrated feature if you’re training in a non-climate-controlled garage.
Most reviewers claim it’s “just as good as gym benches,” but in practice, I found the padding to be a bit stiffer than premium models. It’s great for support, but you might feel it after a 45-minute chest session.
Customer Feedback: High marks for value-for-money, though some users reported the paint can chip if you’re rough with the adjustment pins.
-
Pros:
-
Most affordable reliable option
-
Very lightweight and easy to maneuver
-
Simple, intuitive adjustment mechanism
-
-
Cons:
-
500 lb limit includes the user, so it’s not for heavy powerlifters
-
Padding is a bit firm for some tastes
-
Price Range: Around $95–$120
Value Verdict: Ideal for teenagers, beginners, or those on a strict budget.
4. Keppi Adjustable Weight Bench
The Keppi Adjustable Weight Bench is a stylish powerhouse that boasts a 1,000 lb weight capacity. This is the bench you get when you want to look at your equipment and feel like you’re in a high-end boutique gym.
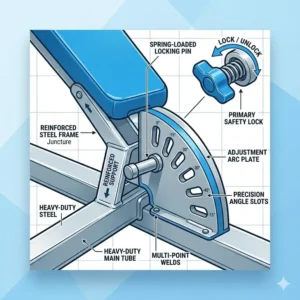
The standout feature here is the “frosted” steel finish and the high-density memory foam padding. When I tested the Keppi, the decline angle felt exceptionally secure due to the oversized, reinforced leg lockdown bar. Unlike other benches that use a single pin, Keppi uses a dual-locking mechanism that eliminates nearly all “play” or “wiggle” in the backrest.
This model is particularly good for decline abdominal work. The angle is steep enough to provide a real challenge for the rectus abdominis, and the frame stays silent—no creaking or groaning under tension.
Customer Feedback: Users rave about the “premium feel” and the thickness of the steel, though some find the logos on the padding a bit flashy.
-
Pros:
-
Industry-leading 1,000 lb capacity
-
Memory foam padding is exceptionally comfortable
-
Very wide base provides elite lateral stability
-
-
Cons:
-
More expensive than basic models
-
The “footprint” is wider, making it harder to fit in tight corners
-
Price Range: $230–$270 range
Value Verdict: The best choice for those who value aesthetics and maximum durability.
5. Bowflex 5.1S Stowable Bench
The Bowflex 5.1S Stowable Bench is the “space-hacker’s” dream. Bowflex has always been a leader in home fitness innovation, and the 5.1S is no exception.
The primary selling point is the vertical storage. You can tilt this bench upward and it stands on its own, reducing the floor space footprint by over 50%. In terms of decline performance, it offers a -20 degree angle that is perfect for hitting those lower pecs. The construction is heavy-duty steel, and the padding has a “contoured” shape that helps center your body during the lift.
What most buyers overlook is the “seat lift” feature. When in a decline, the seat can be raised to create a “cradle” for your hips. This is a subtle engineering detail that makes a massive difference in how much weight you can safely press without feeling like you’re going to slide onto the floor.
Customer Feedback: Phenomenal reviews for the stowable design, but some find the height of the bench (distance from floor to pad) a bit high for shorter users.
-
Pros:
-
Best-in-class vertical storage solution
-
High-quality, durable upholstery
-
Trusted brand with a solid warranty
-
-
Cons:
-
Price is at the higher end of the spectrum
-
Not as many angle increments as some competitors
-
Price Range: Around $250–$300
Value Verdict: Perfect for the “luxury” home gym where space is at a premium.
✨ Don’t Miss These Exclusive Deals!
🔍 Take your chest training to the next level with these carefully selected products. Click on any highlighted item to check current pricing and availability. These tools will help you create a professional-grade home gym your friends will envy!
Practical Usage Guide: Mastering the Decline
Setting up your decline workout bench isn’t just about clicking a pin into a hole; it’s about optimizing your biomechanics to prevent injury and maximize muscle recruitment. If you’ve never used a decline angle before, your first session can feel a bit disorienting as blood rushes to your head.
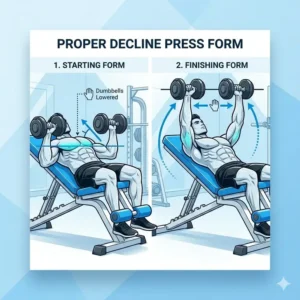
The “First-Use” Protocol
-
Check the Lock: Always double-check that the adjustment pin is fully seated. I’ve seen seasoned lifters take a spill because the pin was only halfway in.
-
The Leg Anchor: Secure your legs before you pick up your weights. In a decline, your shins/ankles are your primary point of stability. If there is a gap between your leg and the roller, wrap a small towel around the roller to “snug” the fit.
-
The Descent: Use a spotter or a power rack for your first few sets. The “rack out” on a decline press is different from a flat press; you have to push the bar slightly “up and back” rather than just “up.”
Maintenance for Longevity
To keep your bench performing like day one, I recommend a “Quarterly Tune-Up”:
-
Tighten the Bolts: Constant vibrating and weight shifting will loosen the nuts over time. Give them a quarter-turn every 3 months.
-
Lube the Pivot: A tiny drop of WD-40 or silicone spray on the main adjustment pivot will prevent that “metal-on-metal” screech.
-
Pad Care: Use a non-bleach disinfectant. Sweat contains salts that can crack faux leather over time. A simple wipe-down after every session adds years to the padding’s life.
Problem → Solution Guide: Overcoming Common Bench Hurdles
Problem: “I feel like I’m sliding off the bench during heavy presses.”
-
Solution: This usually happens because the seat is flat while the backrest is declined. Look for a bench like the Fitness Reality 2000 or Bowflex 5.1S that allows the seat to be angled upward. This creates a “V” shape that locks your pelvis in place.
Problem: “My lower back hurts when I’m in the decline position.”
-
Solution: This is often caused by an excessive arch in the spine. Ensure your legs are firmly locked in the rollers. If the bench angle is too steep (more than -30 degrees), it can put undue pressure on the lumbar spine. Try reducing the decline angle slightly.
Problem: “The bench wobbles when I’m doing dumbbell flyes.”
-
Solution: Check your floor first. Many garage floors are sloped for drainage. If the floor is level, the issue is likely “lateral play” in the adjustment spine. You can often fix this by adding a thin nylon washer to the main pivot bolt to take up the extra space.
Problem: “The leg rollers are too hard and bruise my shins.”
-
Solution: This is a common complaint with budget benches like the PASYOU. An easy “insider hack” is to slide a pair of thick foam pipe insulation sleeves over the existing rollers. It costs about $5 and doubles the cushioning.
How to Choose the Right decline workout bench
Choosing a bench involves more than just looking at the price tag. You need to consider your current strength level, your future goals, and the physical constraints of your workout space.
1. Weight Capacity (The “Real” Number)
When a bench says “800 lbs capacity,” that includes you. If you weigh 250 lbs and you’re aiming for a 300 lb bench press, you’re already at 550 lbs. I always suggest buying a bench with at least 200 lbs more capacity than you think you’ll ever need. This isn’t just for safety; a higher-capacity bench uses thicker steel, which feels more stable during the lift.
2. Footprint and Portability
Measure your space! A “stowable” bench like the Bowflex 5.1S is a game-changer if you’re working out in a bedroom. However, if you have a dedicated gym, a heavier, non-folding bench like the Keppi will always offer a superior, “bolted-to-the-ground” feel.
3. Adjustment Versatility
A dedicated decline-only bench is a waste of money for a home gym. You want an “FID” bench (Flat, Incline, Decline). Check how many “positions” it has. A good bench should offer at least one decline setting, a flat setting, and 3-4 incline settings (30, 45, 60, and 85 degrees).
Decline vs. Flat Bench: Which Dominates for Chest Growth?
While the flat bench is the undisputed king of ego-lifting and overall mass, the decline workout bench is the secret weapon for aesthetic “under-chest” definition.
In a flat press, the tension is distributed across the entire pectoralis major. However, because of the shoulder’s natural mechanics, the upper pecs often take a backseat. In a decline press, the angle of the arms relative to the torso naturally mimics the “dip” movement. This activates the lower costal fibers of the chest more effectively than any other barbell movement.
Furthermore, research published in journals like the Journal of Strength and Conditioning Research has suggested that the decline press may actually elicit higher overall pectoral activation with lower shoulder strain compared to the flat press. For lifters with shoulder impingement issues, the decline angle is often the only way they can press heavy without pain.
Features That Actually Matter (And Those That Don’t)
In the world of fitness marketing, it’s easy to get distracted by “shiny object syndrome.” Here is the expert’s filter on what to pay for:
Matters: The Adjustment Mechanism
Look for a “ladder” style adjustment or a “pop-pin.” Ladder styles are faster and generally safer because you can see exactly where the support bar is resting. Pop-pins are secure but can sometimes get stuck if the frame is slightly misaligned.
Doesn’t Matter: 20+ Adjustment Angles
You don’t need 20 different angles. In reality, you only need about 5 or 6: -20 (Decline), 0 (Flat), 30, 45, 60 (Incline), and 85 (Military). Anything more is just marketing fluff that often compromises the structural integrity of the adjustment spine.
Matters: Pad Width
A pad that is too narrow (under 10 inches) won’t support your shoulder blades, leading to instability. A pad that is too wide (over 12 inches) will restrict your range of motion at the bottom of the press. Look for that “sweet spot” around 11-11.5 inches.
Long-Term Cost & Maintenance Analysis
When you buy a decline workout bench, you aren’t just spending $150; you’re investing in a tool that should last a decade.
-
Year 1: Your main “cost” is the purchase price. Maintenance is minimal—just keeping it clean.
-
Year 3-5: This is when “budget” benches start to show their age. You might notice the faux leather starting to crack at the seams or the pop-pin spring losing its tension. Replacement pins are cheap ($10), but if the frame starts to develop “lean,” it’s time for a new bench.
-
Year 10: A high-quality bench like the Keppi or Bowflex should still be going strong. The “Total Cost of Ownership” for a $250 bench over 10 years is only $25/year. Compare that to a $100 bench that breaks in 2 years ($50/year), and you’ll see why spending a bit more upfront is the smarter financial move.
✨ Don’t Miss These Exclusive Deals!
🔍 Take your chest training to the next level with these carefully selected products. Click on any highlighted item to check current pricing and availability. These tools will help you create a professional-grade home gym your friends will envy!
Conclusion
The decline workout bench is more than just a niche accessory; it’s a fundamental tool for anyone serious about building a balanced, powerful physique. Whether you choose the space-saving brilliance of the Bowflex 5.1S, the brute strength of the Keppi, or the incredible value of the FLYBIRD, adding a decline angle to your routine will unlock new levels of chest and core development.
In my experience, the “best” bench is the one that removes the friction from your workout. If you hate setting it up, you won’t use it. Choose a model that fits your space and your lifting style, and you’ll see the results in the mirror within weeks. Happy lifting!
FAQs
❓ Is a decline workout bench harder than a flat bench?
✅ Actually, most people find they can lift 10-15% more weight on a decline bench. The shorter range of motion and increased mechanical advantage of the lower pecs make it a “stronger” position for the human body…
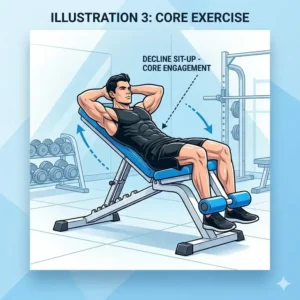
❓ Can I use a decline bench for ab workouts?
✅ Absolutely! It is one of the best tools for decline sit-ups and Russian twists. The leg rollers are specifically designed to anchor you while you perform high-intensity core movements…
❓ Is the blood rush to the head dangerous?
✅ For most healthy individuals, it’s harmless. However, if you have high blood pressure or glaucoma, you should consult a doctor. To minimize the “head rush,” sit upright for 30 seconds between every set…
❓ Does a decline bench help with shoulder pain?
✅ Yes, for many. By shifting the load to the lower pecs, it reduces the “shearing” force on the rotator cuff that often occurs during flat or incline presses…
❓ How much ceiling height do I need for a stowable bench?
✅ Most stowable benches, like the Bowflex 5.1S, stand about 5 feet tall when folded. If you have standard 8-foot ceilings, you will have plenty of room to store it vertically…
Recommended for You
- 5 Best Adjustable Folding Weight Bench Models for 2026 Home Gyms
- 5 Best adjustable bench for sale Options in 2026: Expert Field Tests
- 7 Best incline flat bench Models for 2026: Expert Buying Guide
Disclaimer: This article contains affiliate links. As an Amazon Associate, I earn from qualifying purchases. If you purchase products through these links, we may earn a small commission at no additional cost to you.
✨ Found this helpful? Share it with your friends! 💬🤗
[addtoany]